
As Neil Patel fittingly put it:
No Website can stand without a strong backbone.
And that backbone is technical SEO. – Neil Patel
Many webmasters run into the same problem: They have done their keyword research and created awesome, in-depth articles that are just waiting to take search engines by storm.
But somehow… they just won’t rank.
Now, there could be countless of reasons for that. As you know, Google uses over 200 ranking factors in its search algorithm.
But if you are sure you’ve followed SEO best practice and are convinced your content should rank, then the technical side of things might be the culprit.
Click here to jump directly to the table of contents.
It might not be the most thrilling part of an SEO’s job. But you cannot avoid performing a technical SEO audit every now and then to make sure your website is running smoothly.
Think of technical SEO as the infrastructure of your website. If the infrastructure is not properly set up (meaning for example, if your website loads slowly, if there are broken pages, images or links, if there are server errors, …) visitors won’t enjoy using it.

No one wants to wait forever for a page to load.
And no one wants to see 404 pages or broken links or images.
These issues might cause visitors to hit the back button as soon as they land on your site.
This in turn signals Google that searchers didn’t find what they were looking for on your page – and Google might punish your page my moving it further down the SERPs (search engine results pages).
Don’t fall victim to these technical issues. Read along this technical SEO guide and find out how to properly audit your website – and to identify and fix these issues that might cost you precious traffic!
Don’t feel up to the challenge yourself? Let us and our experienced digital marketers help you out – check out our Technical SEO Audit Service!
Within just two working days we will audit your website and help you get valuable insights into your website’s technical SEO status quo, all together with actionable suggestions for improvements!
Want to do it all yourself? No problem! Just keep on reading and find out how to do a technical SEO audit.
Table of Contents: How to Perform a Technical SEO Audit
We have divided this blog post into different sections corresponding to different aspects of our technical SEO checklist. You can use the navigation below to jump to any of these sections in case you’re just interested in a particular part of this audit.

This post includes affiliate links to tools and products we use and love. If you buy something through those links, we might get some extra coffee money (at no extra cost for you!) which helps us create more awesome posts like this!
Glossary: Terms & Tools
Before we jump right into the action, let’s first get some terms and definitions down so that we are all on the same page and know what tools we’re working with.
Technical SEO describes all the SEO activities you can do on your site apart from the content itself. As briefly mentioned above, technical SEO can be understood as the backbone or infrastructure of your website. Technical SEO makes sure search engines can easily find, crawl, understand and index your pages. This includes aspects such as: broken resources (pages, images, links), load times and mobile-friendliness, among many other things.
This is one of the tools we’ll be working with here. From the program’s website: “The Screaming Frog SEO Spider is a website crawler, that allows you to crawl website’s URLs and fetch key onsite elements to analyze onsite SEO.” It crawls links, images, CSS, scripts and apps of a website and therefore delivers a complete overview of its resources. For the sake of readability, from here on out, we will simply refer to this tool as Screaming Frog.
From the program’s website: “Just like search engine bots, WebSite Auditor digs diligently through your entire site to find and audit every resource, both internal and external: HTML, CSS, JavaScript, Flash, images, videos, and more.” So in general, WebSite Auditor does more or less the same job as Screaming Frog. However, as you will see soon, both tools might deliver quite different results. Since Screaming Frog tends to be more thorough in our experience, we will make use of that tool to get the majority of data. We will use WebSite Auditor to give us some additional information to fill in the gaps.
Apart from the two crawling tools, we’ll also need Google Search Console. Previously known as Google Webmaster Tools, it is a free service offered to website owners/administrators. Through this tool, webmasters get information about how Google is indexing and displaying their pages in its SERPs (search engine results pages). Once you add your website to Google Search Console, it will tell you if there are any issues or errors concerning your website’s indexability, and it will give you statistics about your website’s performance in the search results.
Okay, now that we’re all on the same page, let’s move forward and look at how to do a technical SEO audit step by step.
Preparation: Crawl Your Site
First you want to crawl your website. For this step we will be using both Screaming Frog and WebSite Auditor.
Both of the tools that we use also offer a free version. However, the free versions have some limitations when it comes to the amount of websites that you can crawl:
Screaming Frog allows you to crawl up to 500 resources. If you’re just starting out or have a small website in general, the free version should be sufficient for you.
However, if you have a larger site or have many resources (note: images, css, script files etc. all count towards the limit of 500 resources!) then you might want to invest into the full version to get a complete overview of your website’s resources.
WebSite Auditor lets you crawl one third of your website in the free version. Again, if you want a comprehensive look at all you resources, it might be worth to look into the paid version.
So, download both crawling tools from their respective websites, open them, enter your website’s URL and let them to their work.

Depending on the size of your website, this process might take a while. Feel free to leave the programs running in the background and move on to the next step, since we won’t be needing the crawling results just yet.
Technical SEO Audit: Step by Step
1. General Site Errors
For this step, all we need is Google Search Console.
Navigate to Google Search Console and click into your property. First of all, we want to make sure that there are not some site breaking errors.
You can easily check this in the Dashboard in Google Search Console. Under Current Status, if you can see three little green checkmarks next to DNS, Server Connectivity and Robots.txt fetch, then everything is in order. Is this not the case, then you need to investigate further and fix these issues as soon as possible.

DNS: If there is an issue here, it means that either your DNS server is down or there is an issue with the DNS routing to your domain. Make sure to check with your DNS provider (which is often the same as your hosting provider) if there is an issue here.
Server Connectivity: If there is an issue here, it means you server is too slow to respond or your site is blocking Google. There are several reasons this could happen, such as your server being overloaded or misconfigured. Check with your hosting provider if there’s an issue here.
Robots.txt fetch: You want to make sure there is a robots.txt file available and accessible to search engine crawlers. If it is available but unreachable, Googlebot will postpone indexing your site. If that’s the case, check that your hosting provider or your firewall is not blocking search engines.
So far so good, on to the next section.
2. Indexation
First of all, you want to do a simple Google search for “site:YourURL.com”. Performing this simple test can already reveal some basic issues with your website’s indexation.

The number of results “About x results (x seconds)” should more or less line up with the actual number of pages you’d expect to be indexed by Google. Don’t rely on this too much though, as it can differ greatly from the actual number and it should just give you a rough idea.
What’s more, your website should be the first result that will be displayed (after the potential Try Google Search Console promotion). If it’s not showing up first, it should at least be found on the first page. If your website doesn’t show up at all, it might be because you are inadvertently blocking it (e.g. by robots.txt or robots meta tag) or there might be some other issues affecting your site. Check Google Search Console to find out.
Speaking of robots.txt – next up you should take a closer look at this particular file.
Robots.txt
Every website should have a robots.txt in its top-level directory. This little file tells robots (like Googlebot or other search engine crawlers) how and which pages to crawl on a website.
A typical WordPress robots.txt looks like the following:
User-agent: *
Disallow: /wp-admin/
Allow: /wp-admin/admin-ajax.php
This robots.txt tells all robots (defined by the * asterisk, which is a placeholder that represents any possible string of characters) to not crawl the /wp-admin/ folder (ergo, disallow) except for the /wp-admin/admin-ajax.php file (ergo, allow) within this folder.
In general, as long as you don’t disallow any sections of your site, crawlers will assume the entire site is allowed to crawl:
User-agent: *
Disallow:
As you can see, no directories or files are disallowed. The entire website is allowed to be crawled. Attention, though! The following robots.txt would block all crawlers from you entire site:
User-agent: *
Disallow: /
You can add several lines of User-agents and their directives (Allow, Disallow, Crawl-delay) to instruct different robots differently:
User-agent: *
Disallow: /wp-admin/
Allow: /wp-admin/admin-ajax.php
User-agent: Googlebot
Disallow: /example/
Crawl-delay: 20
This case is exactly like the example above, except that Googlebot is not allowed to crawl the /example/ folder and any sub-folders. It also tells Googlebot to wait 20 milliseconds between crawling each page on your site.
You can also tell search engines where to find your XML sitemap in your robots.txt file:
Sitemap: https://www.example.com/sitemap.xml
This, however, is not necessarily needed as long as you’ve added your sitemaps to Google Search Console and other search engines’ respective webmaster tools.
To sum up, the most important robots.txt directives:
User-agent is used to identify a particular crawler or group of crawlers.
Disallow tells these crawlers which folders or files they are not allowed to crawl.
Allow, in turn, tells these crawlers if there are any exceptions within a disallowed folder, which they are allowed to crawl. While this is not a standard directive and might not be understood by every robot, most crawlers (among them Googlebot) will understand and follow this directive.
Sitemap let search engines know where to find your XML sitemaps.
You can find your website’s robots.txt by either navigating to www.yourwebsite.com/robots.txt or you can directly check it in Google Search Console by navigating to Crawl → robots.txt Tester.

Make sure to not block any important resources from being crawled. Sometimes this can inadvertently happen when you or your developer forget to remove a disallow directive (e.g. when you transition your website out of a testing phase).
As mentioned above, what you definitely should look out for are any Disallow: / directives and double-check if these are rightfully there.
3. HTTP Status Codes
Okay, by now the crawling tools should have done their job, because we will need the results for this step.

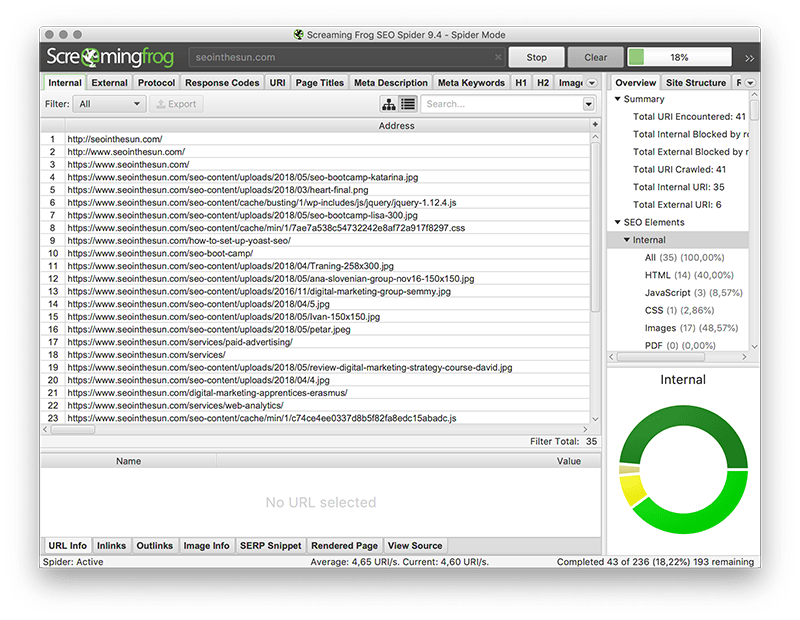
In Screaming Frog, in the Internal tab, scroll to the Status Code column and look out for the following codes (we will only cover the main categories here, for a more detailed explanation, check out this post about HTTP Status Codes):
200 – Success: A 2xx status code tells you that the request was successfully received, understood and accepted. All good here.
3xx – Redirection: When it comes to the 3xx status codes we have to differentiate between the two most common ones.
301 – Moved Permanently: A 301 redirect means a resource has been moved permanently. You mainly employ 301 redirects when the URL of a page has changed, so that users get automatically redirected to the new URL. You also use 301 redirects to redirect users to your preferred site version (i.e. www or non-www) or to redirect users from the http to the https version of your pages.
302 – Found/Moved Temporarily: A 302 redirect is a temporary redirect. There should only be 302 redirects on your website if you deliberately installed them (e.g. when you are updating a page and want to redirect the user in the meantime, or during A/B tests). Otherwise, you should consider changing them to 301s, as 302s don’t pass link juice.
4xx – Client Error: 4xx errors indicate that there is an error or problem on the client’s site (as opposed to the server’s side). It often means that there is a problem on your website. This could simply be a typo in one of your links, or you might have accidentally deleted or changed the URL of one of your pages without implementing a redirect. It’s important to investigate and resolve these crawl errors to not reflect negatively on your website’s rankings, since no one wants to navigate to a site only to find a 404 error.
5xx – Server Error: 5xx errors indicate that there is an error or problem on the server’s side. The same applies here: If your website returns 5xx errors, is is important to investigate and resolve these issues as soon as possible. Talk with your CMS support and/or hosting provider as soon as possible.
Redirect Chains and Custom 404 Error Page
Next to the different errors themselves, you should also look out for redirect chains, as well as make sure that you have a custom 404 error page on your website:
Redirect Chains: Redirect chains happen when page A redirects to page B, which then redirects to page C (and so forth…). It is best practice if you can avoid redirect chains completely. But if you happen to have a lot of redirect chains and simply don’t have the time to deal with them all, at least try to avoid and correct chains that are longer than 2 redirects. There is a chance some pages might not be indexed by search engines as some bots only follow a certain number of redirects. On top of that, redirects slow your website down. To find out if you have any redirect chains, go to Reports → Redirect Chains in the program’s main menu to export a .csv file with all your redirect chains.
Custom 404 Error Page: Having a custom 404 error page with useful links and/or a site search on your website can help you keep users on your website in case they encounter a page that’s not existing (anymore). To see your 404 error page, simply enter a URL that doesn’t exist like www.yourpage.com/randomcharacters1234.
Got all your HTTP status codes sorted out? Great, on to the next section.
4. URL Canonicalization
Take a look at the following two URLs:
www.example.com
example.com
To us, these two examples would be one and the same page. Search engines, however, would treat these examples as two separate pages.
Whether you go for the www or non-www version is basically just a matter of personal preference. Your website won’t perform any better or worse if you go for the www or non-www version.
The important thing is that you should settle for one version to be the preferred domain. And then redirect the non-preferred to the preferred version.
This way you won’t run into duplicate content issues or confuse search engines and users, having both versions competing against each other in the search results.
You can check if you’ve set up the URL canonicalization correctly in WebSite Auditor by navigating to Site Audit → Fixed www and non-www version. It is also recommended to let Google know your preferred domain. You can do so in Google Search Console by clicking on the gear wheel in the top right corner and then navigating to the Site Settings.
5. HTTPS/SSL
If you haven’t installed SSL on your page, it’s high time to do so now. HTTPS has been a ranking factor since 2014 and Google Chrome has started to make it really obvious to visitors if a page is not secured by a SSL certificate.

There really is no reason for you to not use the HTTPS protocol, since there are certificate issuing authorities out there, such as Let’s Encrypt, that will issue SSL certificate for free.
But it’s not just about having HTTPS on your site, it’s also about correct implementation of redirects. The HTTP URLs of your website should redirect to the corresponding HTTPS versions. You can check this in WebSite Auditor by going to Site Audit → Issues with HTTP/HTTPS site versions.
6. XML Sitemaps
A XML sitemap helps search engines to properly crawl your site as they provide an easy-to-understand map of your website’s structure. It informs search engines about all the pages available for crawling and indexing. Many WordPress plugins, such as Yoast SEO, will generate XML sitemaps and keep them up to date for you automatically:

To check if you have an XML sitemap present, navigate to Site Audit → .xml sitemap in WebSite Auditor.
You also want to make sure to submit your sitemap(s) to Google Search Console, which will help Google crawl and index your site faster. Often Google will find your sitemaps by itself, but just to double-check, go to Google Search Console and navigate to Crawl → Sitemaps to see if Google has found your sitemap(s). Here you can also add them yourself if that’s not the case.
7. Broken External Resources (Images, Links)
Broken outgoing links are not only bad user experience, but might also affect your rankings. You can check if you link to any broken external pages by navigating to the External tab in Screaming From, filtering it for HTML and looking at the Status Code column.

We already looked in detail at the different HTTPS status codes in section 3. HTTP Status Codes of this blog post. Make sure to look out for any 4xx and 5xx errors and update or remove these links.
The same applies to images. You can find them in the same External report, only this time filter the report by Images. If there are any broken images, make sure to update or remove them. And in general, it’s best practice to host images yourself. The added benefit of this is that you might rake in some additional traffic through image searches (remember to optimize your image alt tags!).
8. Title Tags & Meta Descriptions
When it comes to your title tags and meta descriptions, there are basically three things you want to look out for if you want to follow technical SEO best practice:
Are there any missing titles or descriptions?
Are there any duplicate titles or descriptions?
And are there any titles or descriptions that are too long?
You can find these in Screaming Frog by going to the Page Titles or Meta Description tabs and filtering the report, as seen in the following screenshot:

Of course you want to make sure that none of your pages miss a title tag. It tells users and search engines what your page is about and Google will normally use the title tag and display it as the title for your page in the search results.
The same goes for the meta description. You should write a meta description for all of your pages (at least those that (potentially) could get indexed). Most of the times Google will use this information to display as the description in its search results.
But it’s not just about having title tags and meta descriptions. You also want to make sure that each and every page has a unique title and description. This way you won’t confuse users and search engines. And, it’s easier for search engines to understand which page is more relevant for which search query.
Last but not least, you want to make sure that your titles and descriptions are not too long. If your title is longer than about 70 characters and if your description is longer than around 155 characters, Google might cut you off and important information that came after these cut-off points might not be displayed.

9. Structured Data
Structured data is basically some code that you add to your pages to make its content easier to understand for search engines. For example, on a recipe page you could include structured data to let search engines know information like ratings, cooking times or calories:

As you can see in the image above, for certain search queries, search engines might then directly pull this information and display it in the search results as a so-called rich snippet.
If you implemented structured data on your website to help search engines better understand the meaning of a page, you want to make sure there are no errors concerning these.
To check if there are any errors when it comes to structured data, go to Google Search Console and navigate to Search Appearance → Structured Data. You can also make use of Google’s Structured Data Testing Tool to test individual pages. It will give you a detailed rundown of all the structured data elements found on that particular page together with any warnings or errors Google might have found.
10. Malware
This is a no-brainer, but of course you want your website to be free of malware. While back in the days malware mainly showed itself in the form of spammy links in comment fields or forums, nowadays malware is far more hacking-oriented and people might actually try to put malicious content or code on your website or get confidential information or user data.
Sometimes, you might not even realize it when your website has been hacked or affected by malware in some way. But there are several online tools out there that will check your website for any malware, for example this website malware and security scanner by Sucuri.
Simply navigate to that website, enter your website URL, hit enter and let the tool work its magic. Among other security aspects, the tool will tell you if it’s found any malware on your website.
11. Mobile-Friendliness
The Mobilegeddon search algorithm update in 2015 already made significant changes to how Google ranks pages on mobile searches. This year, Google announced it would slowly move websites over to its mobile-first indexing. That means that Google will mainly use mobile versions to crawl, rank, and index pages.
So, now it is more important than ever that your website is mobile-friendly. For you this basically means that your website should be just as easily accessible, usable and readable on mobile as it is on desktop.

If you already have a mobile version and have been serving the same content on both your desktop and mobile version (either through responsive design or by other means), then the changes shouldn’t affect your rankings.
However, if you haven’t optimized your website for mobile yet, now is the time to do so! To test if your website is mobile-friendly, you can use Google’s Mobile-Friendly Test. You don’t know where to start when it comes to mobile websites? Google offers some great resources and guidelines.
12. Website Speed
Last but definitely not least, you want to make sure your website loads fast. There are several tools out there that let you test your website’s speed. We like to use Pingdom.

All you have to do is enter the URL you want to test, select the location to test from, and start the test.
Don’t make the mistake of just running the test once with your homepage. Since loading times can vary, you should run the test several times and calculate the average. Also, aside from your homepage, you should test several of your most important landing pages. We normally take the five most important ones, test them and calculate the average to get an overall loading time for a website.
Ideally, you would want your website to load as fast as possible, since the longer the load time, the higher the probability of visitors to bounce back to Google. Aim for a load time below 3 or 2 seconds – the faster the better.
There are many factors at play that might cause your website to load slowly. Make sure to have a fast hosting provider, small image and file sizes and a caching plugin.
Conclusion
And that concludes our technical SEO audit. We covered the most important aspects when it comes to technical SEO and you should now have a good understanding about what issues to look out for when auditing your website.
All these aspects taken together make sure that search engines can easily find, crawl, understand and index your website.
An SEO’s job of course doesn’t end there. Apart from the technical side of things, you want to take care of all the other SEO aspects as well. Feel free to browse through our posts, which covers aspects such as keyword research or on-page SEO, among others.
Do you still feel you’re not up to the challenge to do a technical SEO audit yourself? Or maybe you simply don’t have the time or motivation (or the money for the paid versions of the crawling tools)? Then our Technical SEO Audit Service might be just what you’re looking for! Within two working days we will audit your website and deliver the findings in a nicely presented spreadsheet.

Technical SEO Audit
Do you have awesome pages that just won’t rank? Maybe it’s time to give technical SEO a closer look.
Our audit will give you a complete rundown of your websites resources. We’ll check the most common pitfalls and give you actionable suggestions for improvement.