Do you have a WordPress site?
Then you most likely have heard of and wonder how to set up Google Analytics.
You might also have heard of Google Search Console (or how it used to be called: Google Webmaster Tools).
These two tools provide you with valuable insights into your website’s performance. And if installed and utilised correctly, they will aid you and your website to new heights.
But, let’s be honest, you are a busy webmaster. We all are.
We all have many things on our minds: how to set up Google Analytics, how to add our websites to Google Search Console or how to implement the tracking code. You don’t have the time – or the motivation – to read into how all of this works?
After all, even beginning to understand how to set up Google Analytics is an intimidating undertaking. Many young webmasters fail and end up demotivated.
Good news:
We have developed a service that will take the hassle of understanding how to set up Google Analytics out of your hands.
With our Google Analytics Setup Service, you’ll receive the whole package!
In just 2 working days – tops! – we will …
… set up a Google Analytics account for you – if you don’t already have one.
… add your website to Google Search Console.
… implement the tracking code on your website.
… configure Google Analytics correctly for you.
… set up automated weekly or monthly PDF reports sent straight to your inbox.
Sounds interesting? Even better:
In this post, we explain all steps of the process that we use for our Basic Google Analytics Setup Service. So if you do have the time and motivation, keep reading and learn how to set up Google Analytics all by yourself!
That’s right. Bear with us and take your first steps into the world of website tracking. Learn to better understand your own website with the plethora of data and insights you can get out of a Google Analytics.
Become a better webmaster with us!
Terms & Tools: Website Tracking Lingo
Before we start, let’s get a few basic definitions down so that we’re all on the same page:
Google Analytics is the world’s leading tool for website traffic tracking and reporting.
To set Google Analytics up, you have to create a free account and add a small snippet of code (tracking code) to every page of your website. Theoretically, you could go into your website’s code and manually add the snippet to each page yourself.
Luckily, many Content Management Systems (CMS, such as WordPress) already offer ways to add the tracking code to your whole site. We’ll explain later on how this works with just a few clicks.
Google Search Console (previously known as Google Webmaster Tools) is another free service offered by Google.
Webmasters get info about how Google is indexing and displaying their sites in its SERPs (Search Engine Results Pages). Once you add your website to Google Search Console, you get the search queries that returned your website’s pages in the Google SERPs.
This comes together with info about how many people saw and clicked on those results.
KPI stands for Key Performance Indicator. All KPIs are metrics, however, not all metrics are KPIs.
A metric is basically just a number – a quantitative assessment used for measurement and comparison. It helps to track your performance/production and could be the number of page views of a website or the amount of produced goods within a given timeframe.
Some metrics might be more important for your business than others, and this is where KPIs come into the picture.
KPIs are a set of key metrics you define for your company or website that you can use to evaluate the performance of your business over time.
Google Analytics tracks many metrics related to a website’s performance. So you simply can select the right KPIs for your Google Analytics custom report!
How To Set Up Google Analytics
4 Easy Steps
Now that we’re all on the same page, let’s jump right in! The steps seem simple at first, but – as so often – the devil is in the detail.
To avoid useless or incorrect data, it’s vital to pay attention to even the small settings. So read along and learn how to set up Google Analytics in just 4 simple steps!
Quicklinks:
Step 1: What information do you need to begin with?
First and foremost, we make sure we have all the information we need for a Google Search Console and Google Analytics implementation. Remember: our final goal is to tell you how to set up Google Analytics with a weekly report (or monthly, if you wish) for your business.
Apart from some minor additional info here and there, you need three things:
- WordPress site
- Google/Google Analytics account
- Selection of up to 12 KPIs to track in a Google Analytics custom report
And that’s it. So, now that we have cleared the basics, it’s time to get busy.
Step 2: How to create a Google Analytics account?
The first thing that needs to be done: Set up your Google Analytics account and add your website to Google Search Console (if you haven’t done so already, of course).
Google Analytics Account
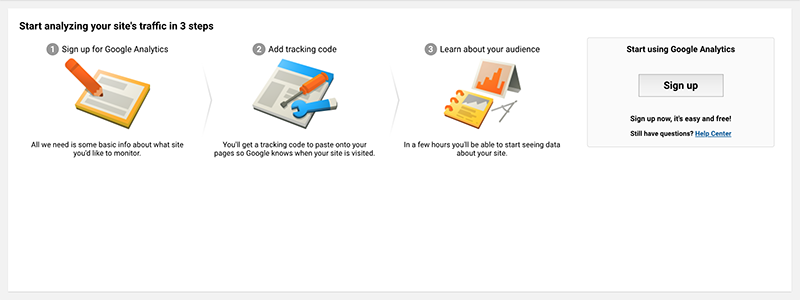
Setting up a Google Analytics account is easy.
All you have to do is to head to the Google Analytics homepage while you’re logged into your Google account. Once there, hit “Sign up”, enter some basic info about your website (industry/time zone) and voilà!
You will be presented with your very own tracking code.
For now, this is all you have to do here. We will come back to Google Analytics in Step 3. There you’ll adjust some configurations and implement the tracking code. Once it’s on your website, Google can start collecting data.
Google Search Console Account

Adding a website (a property) to Google Search Console in itself is straightforward. You simply have to head to the Google Search Console website while being logged into your Google account. Once there, hit “Add a property” and enter your website’s URL.
Done. But …
Now you need to verify that this website is, in fact, your website. Otherwise, anybody could just go and spy on any website’s performance in Google’s search results. So now we have to work with some code.
There are several possibilities to verify that you are the owner of a website. Here, we use the “HTML tag” method. To complete the Google Search Console verification you have to add an HTML verification code to the header section of your website.
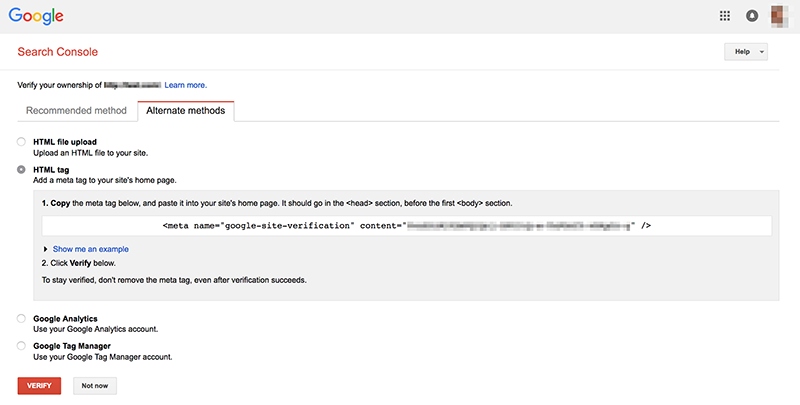
For this, you need to install a little plugin on your WordPress backend that allows you to add code to the header part of your website.
For us, the “Header Footer Code Manager” plugin has proven to be a simple and reliable option for this.
On your WordPress backend, simply navigate to Plugins → Add New , search for “Header Footer Code Manager”, install and activate it.
Some WordPress templates (e.g. Avada) have a built-in option to add code to the header and footer section of each page.
Please check if that’s the case for your template. If it is, then this would be the preferable method of course, as you don’t have to install an extra plugin.
Once installed, all you have to do is to copy the HTML tag (see image above) and paste it into the header section of your website using the plugin. This tag will then be used by Google Search Console to determine and verify that you are the owner of this website.
Now just go back to Google Search Console, hit “Verify” and you’re done.
Well, almost…
In Google Search Console, you can add multiple properties. And to not miss out on any data, you should make use of this!
Add both the www and the non-www version of your website, as well as both the http:// as well as the https:// version (if your website supports the https protocol). In practice, this means to add all of the following properties to Google Search Console:
- http://www.example.com/
- http://example.com/
- https://www.example.com/
- https://example.com
Lucky you: You don’t have to add the HTML tag to your website four times since you’ve already done that with the first one. You simply have to add all the variants, hit “Verify” each time and that’s it.
Step 3: What’s the right Google Analytics configuration?
Ok then. All accounts are set up, now it’s time to get the Google Analytics tracking code and add it to your website.
The process is comparable to adding the Google Search Console verification HTML tag. So we basically already covered how to do this. But before you add the Google Analytics tracking code, you should get the basic configurations right. That’s the only way to make sure that Google Analytics works and collects the right data.
There are three things you need to do here now:
Configuring Google Analytics View
First, you will create a new “View” within Google Analytics.
A View is a subset of a property in Google Analytics to which you can apply its very own configurations. You do this to keep the original View with the raw, unfiltered, unconfigured data for backup purposes.
Create a new View by clicking “Create New View” within the Admin section of Google Analytics.
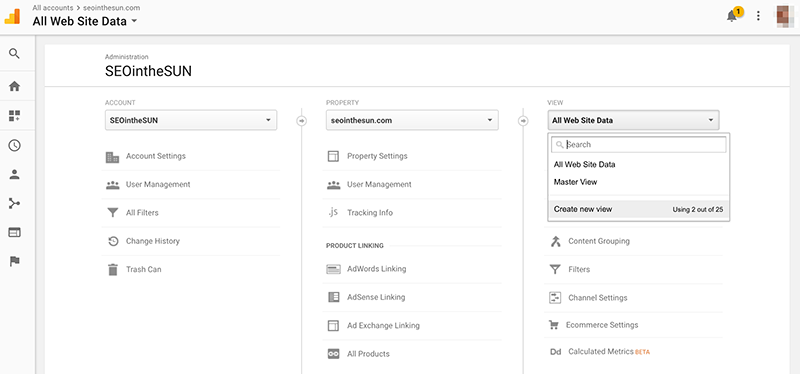
Second, you need to configure the newly created View to exclude bot traffic. This is traffic from known bots and spiders and should not be counted in the data sets. Also, include demographics and interest data to get more detailed information about your visitors.
Do so in the Admin section of Google Analytics under the View and Property Settings, respectively.
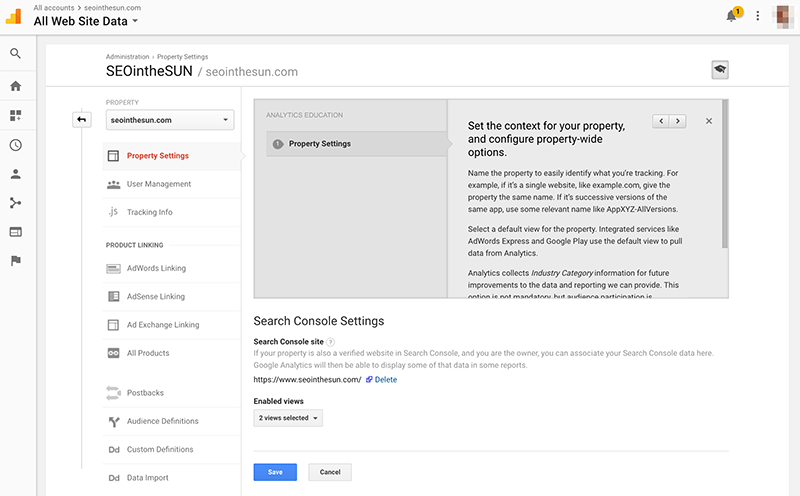
Third, you need to connect Google Search Console with Google Analytics. To do so, go into the Property setting and enable Search Console for the View that we just created (see image below).
And now it’s time for the core part of how to set up Google Analytics: the tracking code.
Google Analytics Tracking Code Placement
Google Analytics only works correctly once you’ve added its tracking code to the header section of each and every page.
This tracking code can be found in the Property Settings of the Admin panel in Google Analytics by going to Tracking Info → Tracking Code. The code should look something like this:
Simply copy and paste it into the header section of the website, using the same plugin we already used when adding the Google Search Console HTML tag.
Once you have done that, Google will start tracking your website’s traffic. It might, however, take a couple of days until that data is ready to be displayed within Google Analytics.
But it doesn’t stop there. The question now is, what to do with all this sweet data that Google is collecting for you?
This is where the last step of our Basic Google Analytics Setup Service comes into play: An automated weekly or monthly Google Analytics report of up to 12 KPIs that will land directly in your email inbox.
Step 4: How to set up Google Analytics email reports?
All our clients have the option to select up to 12 KPIs from a list of basic metrics that can be tracked by Google Analytics.
Why 12 KPIs you ask? This is because of a limitation within Google Analytics. In order to get automated email reports, you need to set up a so-called Custom Dashboard. This will give you an overview of several metrics all in one place – and these Custom Dashboards are limited to 12 metrics.
We have prepared a handy KPI Guide (PDF) with all metrics that our clients can select. It comes with a short explanation of what insights these metrics might provide you with.
Feel free to download it. Use it to become familiar with some of the metrics that you can choose as your KPIs in your custom report!
Google Analytics Dashboard Setup
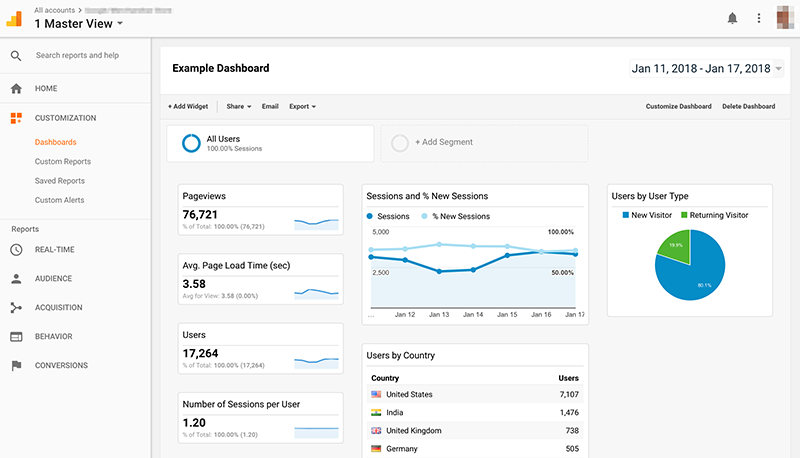
You can create a new Dashboard on the left-hand menu in Google Analytics. Simply go to Customization → Dashboards and click on “Create”.
To add KPIs to the newly created Dashboard, simply click “Add Widget” and select the widget type (such as table or graph) and the appropriate metric(s).
It might be a bit tricky at first to know how to configure each widget to make it display the information you want. However, you can’t do anything wrong here.
If in doubt, check out this article by Google which goes into more detail regarding the different widget types.
Repeat this step until you have all the widget you want on your Dashboard.
Automated Google Analytics Custom Report Setup
Now that you know how to set up Google Analytics, the hard part is over. All that’s left to do is to schedule automated weekly or monthly email reports.
That’s possible with the Custom Dashboard we just created. Click the little “Email” link above the Dashboard and enter your email address. You can also select the time interval in which the reports should be sent.
Hit “Send” and congratulations! Now you’ll receive automated email reports to keep track of your website’s performance.
Keep in mind though that there might not be much/any data displayed in the first email. Since you just set up Google Analytics, it first needs some time to collect and process data.
Conclusion: The Devil is in the Detail
So there you have it. This is how we do it here at SEOintheSUN.
You might ask yourself: If we offer this service, why do we explain you exactly how to do it yourself?
Well, if you want to, you can definitely do this yourself. That’s why we wrote this blog post after all. We wanted to give you a Google Analytics walkthrough for your website: Now you should know how to set up Google Analytics together with Google Search Console.
However, we’ve said it before and we will say it again:
The devil is in the detail.
You have to work with code and add the HTML tag and tracking code to the right places. The Google Analytics configuration needs to be done right. One wrong checkbox can mean you’ll end up with incorrect and useless data.
Believe us, if you’ve never worked with Google Analytics before, it will be confusing. You have to take into account that it will take a while to learn the ropes of how everything works. Let alone to learn what all the terms and settings mean. And time is a precious resource.
Are you too busy to go through this process yourself or do you still feel a bit overwhelmed? We are ready to take this hassle out of your hands.
At SEOintheSUN we can look back on many years of experience in digital marketing – particularly Google Analytics.
Plus we have streamlined the execution of this process. Once you order, you’ll have the result within two working days. Guaranteed!
Head over to our service page and take a look for yourself.

Basic Google Analytics Setup
You know that you need analytics numbers but you hate the idea of setting up the whole thing?
Keep calm and let us take care of that. You only check your inbox and get your custom report with 12 basic metrics.

